It's been almost a year since the finish of the guest room project it's been a nice break and we've gotten some other small projects done in the basement. We have also gotten a new furnace and air conditioner installed, whoo hoo!
The living room and dining room is something I have wanted to tackle for awhile but it's a large project with the archways connecting the living room, dining room, and front hall and french doors leading into the sun room there is no easy starting and stopping point so the rooms need to be addressed as a group.
They were far from the worst rooms in our house but I'm more of a natural trim non-wallpaper kind of girl so I really wanted to tear into these to get out the old lady sheik. On deck for this project is the removal of the ceilings in all 3 rooms, removal of wallpaper, plaster patching, trim stripping, rewiring, ceiling replacement, window repair, trim refinishing, floor refinishing, repaint, new blinds and curtains, and replacement of most of the furniture. Needless to say this is a large project. I would love to say that this will be done by the end of the summer but I think a more realistic goal would be to be to the painting stage 1 year from now.
It won't be so bad... we have an extra living room upstairs in what used to be the apartment and we've managed to box up and pack away almost everything we want to keep from the old setup. Plus I'm trying to do a better job of cleaning up at the end of the day to hopefully make the process a little less stressful on everyone. It's going to be a long one but I think it's going to be worth it.
Sunday, May 22, 2011
Monday, July 19, 2010
All I wanted to do was plug in a fan...
Our house has a little sun room in the front of the house, the real estate listing called it a piano room but I always thought of it as the sun room. It's a small, only about 10 x 4 with windows on all sides and we never really found a good use for it, so when we purchased a treadmill earlier this year we started using it as a an exercise room.
Over the years most of the power in the downstairs of our house has been upgraded but in the case of the piano / sun room it was only updated as far as the basement. Below each of the outlets there was a junction box where the new basement wire was spliced into old knob and tube. We decided that plugging the treadmill into an outlet wired about 40 years before the modern treadmill was invented perhaps, was not the best idea. So Chris and I took a Saturday morning and pulled new wire for the north side outlet for the treadmill leaving the South side outlet untouched, figuring the only thing we might ever plug into it was a small fan, and the wiring should be able to handle that no problem.
Well a few months back it started to get a little warm when running out there so I decided to go ahead and plug a fan in. Immediately I run into a snag, the outlet is not polarized and the fan is. So I ran down to the basement where I have a grounding adapter figuring, without looking twice that this will take care of the problem, only to discover that that adapter is also polarized. At that point I decided to just throw in the towel and use one of the living room outlets. The closest outlet was thankfully polarized but the cord for the fan was too short and the only extension cord I could find was grounded. So I ended up using the living room outlet with both the grounding adapter and the extension cord.
I had a day off last week so I decided the tackle the sun room outlet so I could just plug in the damned fan already. I figured Chris and I were able to wire up the north outlet together in an hour, me doing the south outlet alone couldn't possibly take more than 2 hours. Four hours later I had some nice road rash going on my right arm and had various cuts and scratches all over, and all I had to show for it is the complete and total removal of the original wires, the ones I had planned to use to pull through the new wiring. At this point I took the only option left to me which was to remove the original electrical box and knock a larger hole so I could fish the new wire down into the basement.
Here is the original outlet, we had 2 of these in the house when we moved in according to Wikipedia this is is a "parallel and tandem outlet" rated at 250 v 10 A and can handle either a NEMA 1-15 or 2-15 plug. The 2-15 standard hasn't been used since the 60's so this must be quite a bit older than that.

Here is the original electrical box. This puppy was really in there, the cleat you can see on the right was nailed into the stud while the metal tabs on the left hand side had lath sandwiched between them.
And all told here is the damage I'm still trying to figure out of if the house or I got the worst of it.


At any rate by Sunday night I was able to get the whole patched up and the outlet installed. The wallpaper was a casually but fortunately the long sheers the previous owner left us seem to cover the area nicely.
Over the years most of the power in the downstairs of our house has been upgraded but in the case of the piano / sun room it was only updated as far as the basement. Below each of the outlets there was a junction box where the new basement wire was spliced into old knob and tube. We decided that plugging the treadmill into an outlet wired about 40 years before the modern treadmill was invented perhaps, was not the best idea. So Chris and I took a Saturday morning and pulled new wire for the north side outlet for the treadmill leaving the South side outlet untouched, figuring the only thing we might ever plug into it was a small fan, and the wiring should be able to handle that no problem.
Well a few months back it started to get a little warm when running out there so I decided to go ahead and plug a fan in. Immediately I run into a snag, the outlet is not polarized and the fan is. So I ran down to the basement where I have a grounding adapter figuring, without looking twice that this will take care of the problem, only to discover that that adapter is also polarized. At that point I decided to just throw in the towel and use one of the living room outlets. The closest outlet was thankfully polarized but the cord for the fan was too short and the only extension cord I could find was grounded. So I ended up using the living room outlet with both the grounding adapter and the extension cord.
I had a day off last week so I decided the tackle the sun room outlet so I could just plug in the damned fan already. I figured Chris and I were able to wire up the north outlet together in an hour, me doing the south outlet alone couldn't possibly take more than 2 hours. Four hours later I had some nice road rash going on my right arm and had various cuts and scratches all over, and all I had to show for it is the complete and total removal of the original wires, the ones I had planned to use to pull through the new wiring. At this point I took the only option left to me which was to remove the original electrical box and knock a larger hole so I could fish the new wire down into the basement.
Here is the original outlet, we had 2 of these in the house when we moved in according to Wikipedia this is is a "parallel and tandem outlet" rated at 250 v 10 A and can handle either a NEMA 1-15 or 2-15 plug. The 2-15 standard hasn't been used since the 60's so this must be quite a bit older than that.

Here is the original electrical box. This puppy was really in there, the cleat you can see on the right was nailed into the stud while the metal tabs on the left hand side had lath sandwiched between them.
And all told here is the damage I'm still trying to figure out of if the house or I got the worst of it.
At any rate by Sunday night I was able to get the whole patched up and the outlet installed. The wallpaper was a casually but fortunately the long sheers the previous owner left us seem to cover the area nicely.
Tuesday, January 5, 2010
Return to the guest room.
Well after powering through during my week of furlough things slowed down to a crawl right right before Christmas I broke into the finishing phase of the project. During the gap we stripped off all of the wallpaper, washed and scraped the walls to remove all of the old wallpaper glue stripped all of the trim and floor. By far the most painful part was patching the walls pretty much from June to November it was sanding the walls it was just so miserable I could barley make myself do an hour on it a day so it dragged on forever and ever. In December I started the finishing processing on the trim, I have some more detailed pictures of the process that I'll put up in a separate post we also brought someone in to redo the walls in our large closet which I also have some pictures of. More to come soon.
Thursday, May 21, 2009
Guest Room - Day 3
Yesterday I removed the carpet from the large closet and began stripping the entry door. Kind of a slow day. It's interesting to look around upstairs it looks like much of the trim and doors were salvaged from other properties. For example the bedroom door and one of the other doors upstairs have a double bevel edge on the panels.
While most of the others have a single bevel.
It also appears that the bedroom door once had a rim style lock instead of the current mortise variety. There is a hole about an inch from the edge of the door that was patched with a dowel at some point.
Tuesday, May 19, 2009
Guest Room - Day 2
Well it's the end of day 2 the paneling is all down and the carpet om the room is all up. I decided to pull up the carpet because when I get into the stripping I don't want to pull out a carpet sodden with stripper later on in the process. I figure in the past 2 days I've taken the room back about 40 years.
I figure it must have been pretty comical for all 5 feet of me to be carrying these 4 x 8 sheets of paneling down the stairs and hoisting them into the dumpster.
Tomorrow I'm going to remove the carpet from the large closet and start stripping some trim. Rather than starting on the windows I'm thinking of starting on the door instead, since the floor will need to be refinished anyways I'm thinking about doing it in the room itself.

I figure it must have been pretty comical for all 5 feet of me to be carrying these 4 x 8 sheets of paneling down the stairs and hoisting them into the dumpster.
Tomorrow I'm going to remove the carpet from the large closet and start stripping some trim. Rather than starting on the windows I'm thinking of starting on the door instead, since the floor will need to be refinished anyways I'm thinking about doing it in the room itself.
Monday, May 18, 2009
Guest Room - Day 1
Just finished up Day 1. I got the ceiling tiles removed and the furring strips down. The furring strips were probably the most difficult part. Many of them had a lot of nails located all in the same area. Good news is the ceiling looks to be in relatively good condition, although wallpapered of course. I did make kind of a cool discovery. Around the light fixture there is an oval outline. I suspect that at some point the room had a fixture similar to this.

I removed a couple sections of paneling. My goal was to get all of it down but I also neglected to consider the furring strips which was the most time consuming part. This is what was hiding under the paneling. It looks to be the same wallpaper that was in our bedroom except in blue instead of red.

Tomorrows goal is to get down the remainder of the paneling and to get the first window apart.

I removed a couple sections of paneling. My goal was to get all of it down but I also neglected to consider the furring strips which was the most time consuming part. This is what was hiding under the paneling. It looks to be the same wallpaper that was in our bedroom except in blue instead of red.
Tomorrows goal is to get down the remainder of the paneling and to get the first window apart.
Sunday, May 17, 2009
Home Improvement Week 2009
Due to the crappy economy I am required to take a week of unpaid time off this year. So I've decided to make the best of things and tackle the guest room, the current price holder for the ugliest room in our home. Current goal is to remove the paneling and ceiling tiles and to begin the process of reconditioning the windows by getting the frames and sashes stripped. Hopefully I'll be able to get more done but without knowing the condition of the underlying walls and ceiling it's difficult to know what kind of challenge awaits.


Stairs Updated Photos
Saturday, April 11, 2009
Back into the game
It's been awhile but we are back to working on the house. We did do a few random projects over the winter. Chris worked on getting his workshop set up and I finished up the door for the bathroom which was one of the hold overs from the kitchen project. I'll have to post about that one later as it was necessary to do some minor repairs to get the bathroom door in order.
This most recent burst of home improvement mojo is due to refinancing, a 2% drop in interest rate was just way to good to pass up. Especially when the mortgage lady thinks the kitchen remodel may jump up the home's value by 10,000. We shall see, but at any rate I want the stairs to be nice and complete because every little bit helps.
Anyways on to the pictures.
Here is what the stairs looked like in March of 2007, it's frightening but this project has been going on for 2 years. Yikes! I guess we let this one spiral a bit out of control.

And here is what they looked like after the removal of the paneling and carpet. Not bad but the tack strip removal and years of carpet encapsulation definitely was a bit rough on them. On a side note look at those awful kitchen walls. It's true what they say it definitely gets worse before it gets better.
After stripping, cleaning, sanding, and 3 coats of Waterlox over the past 3 days they look like this. I'm pretty excited that whatever the next project it won't involve hanging out on the stairs.
Paint will go on over the course of this next week. I'm looking forward to it. It's going to be nice to finally have this wrapped up.
This most recent burst of home improvement mojo is due to refinancing, a 2% drop in interest rate was just way to good to pass up. Especially when the mortgage lady thinks the kitchen remodel may jump up the home's value by 10,000. We shall see, but at any rate I want the stairs to be nice and complete because every little bit helps.
Anyways on to the pictures.
Here is what the stairs looked like in March of 2007, it's frightening but this project has been going on for 2 years. Yikes! I guess we let this one spiral a bit out of control.
And here is what they looked like after the removal of the paneling and carpet. Not bad but the tack strip removal and years of carpet encapsulation definitely was a bit rough on them. On a side note look at those awful kitchen walls. It's true what they say it definitely gets worse before it gets better.
After stripping, cleaning, sanding, and 3 coats of Waterlox over the past 3 days they look like this. I'm pretty excited that whatever the next project it won't involve hanging out on the stairs.

Paint will go on over the course of this next week. I'm looking forward to it. It's going to be nice to finally have this wrapped up.
Labels:
progress,
project that stretch into infinity,
Stairs,
Waterlox
Tuesday, December 2, 2008
a quick update
We have more or less taken a break to enjoy the house and the new kitchen. Now that winter is coming quickly we are working on getting our workshops in the basement.
Friday, September 5, 2008
Slowly Plugging Away on the Back Hall
I was able to get the bead board and trim stained this past weekend using the new technique of the alcohol dye. I'm pretty happy with the results the color isn't as vibrant as the dyed shellac but the tone is much more even and it's far easier to work with.
Before we removed the Vinyl flooring from the back hall my plan was to just paint the back steps I figured they would be in horrible condition and it wouldn't be worth the time to ready them for a clear finish. Then I would have added some sand to the tread to keep people slipping with wet feet.
Turns out the stairs other than some damage from the metal tips the stairs were in rather good condition. So I decided to stain and clear coat them however I was still concerned about them being slick so I did a little online research and found out that you could at a clear sand like material to the clear coat to give the stairs some grip I called around and found this http://www.hcconcrete.com/products/solid-color-stains/Shark_Grip_Slip_Resistant_Additive/index.jsp at Sherwin Williams I mixed it in with Waterlox and rolled it onto the stair treads. It's barley noticeable when looking straight on which is really nice. But still gives you that grit that keeps you from riding down the stairs on your keester.
Here is one of the treads with the Clear Coat and SharkGrip
Tonight I'm going to apply another coat then one or two on Saturday and it should be it for the stairs then it's time for paint!
Before we removed the Vinyl flooring from the back hall my plan was to just paint the back steps I figured they would be in horrible condition and it wouldn't be worth the time to ready them for a clear finish. Then I would have added some sand to the tread to keep people slipping with wet feet.
Turns out the stairs other than some damage from the metal tips the stairs were in rather good condition. So I decided to stain and clear coat them however I was still concerned about them being slick so I did a little online research and found out that you could at a clear sand like material to the clear coat to give the stairs some grip I called around and found this http://www.hcconcrete.com/products/solid-color-stains/Shark_Grip_Slip_Resistant_Additive/index.jsp at Sherwin Williams I mixed it in with Waterlox and rolled it onto the stair treads. It's barley noticeable when looking straight on which is really nice. But still gives you that grit that keeps you from riding down the stairs on your keester.
Here is one of the treads with the Clear Coat and SharkGrip
Wednesday, August 20, 2008
Back from the Hiatus
I'm happy to say that even though we have not posted to the web in awhile we did manage to get a lot done. We have the kitchen to a 99.9% finish point.
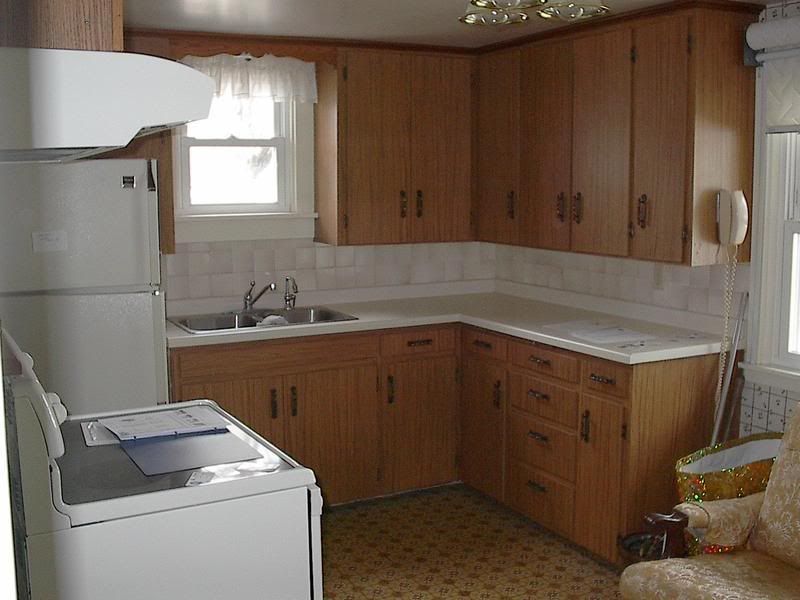
Here is the way it looked in May of 2006 when we bought the house.

And here it is this past weekend.
We have also been working on getting the back hall ready for paint. The back hall needed a lot of patching I think that is where the apprentice plaster was at work the plaster is thin and brittle especially around the ceiling area so when they put up the paneling it just got destroyed.
We also removed the carpeting from the living room, dining room, and upstairs sitting room.

All of the floors were in relatively good condition however the living room and dining rooms have rug outlines in the center of the rooms which I thought may be the case considering the age of the house. We bought a rug for the living room and are waiting on the dining room for the time being. It still looks better than that carpet looked towards the end, ick!
Here is the way it looked in May of 2006 when we bought the house.
And here it is this past weekend.
We have also been working on getting the back hall ready for paint. The back hall needed a lot of patching I think that is where the apprentice plaster was at work the plaster is thin and brittle especially around the ceiling area so when they put up the paneling it just got destroyed.
We also removed the carpeting from the living room, dining room, and upstairs sitting room.
All of the floors were in relatively good condition however the living room and dining rooms have rug outlines in the center of the rooms which I thought may be the case considering the age of the house. We bought a rug for the living room and are waiting on the dining room for the time being. It still looks better than that carpet looked towards the end, ick!
Thursday, July 10, 2008
We are in the kitchen
Well we are in the kitchen now and it's great to be able to cook on an actual stove and not have to run up and down stairs to eat. We still do not have a pantry but I'm working on fixing that. I need to finish the cabinet for the pantry.
The cabinet is going pretty well I was going to do one piece, but at 89" tall, 20" deep, and 33" wide it is a bit to large to fit in the pantry assembled and assembling it in the pantry will probably compromise it's integrity, so i chopped it in half. Now i have a 35" tall by 20" deep by 33" wide base cabinet and an upper cabinet which means that I can assemble them in the basement and just mount them to the wall when finished.
The deer have been in the Hostas which is a pain. I just need to remember to use liquid fence, it seems to keep them away, but only last a week or so.
I have some pictures of the garden and the cabinet which i will post later.
I will post pictures soon
The cabinet is going pretty well I was going to do one piece, but at 89" tall, 20" deep, and 33" wide it is a bit to large to fit in the pantry assembled and assembling it in the pantry will probably compromise it's integrity, so i chopped it in half. Now i have a 35" tall by 20" deep by 33" wide base cabinet and an upper cabinet which means that I can assemble them in the basement and just mount them to the wall when finished.
The deer have been in the Hostas which is a pain. I just need to remember to use liquid fence, it seems to keep them away, but only last a week or so.
I have some pictures of the garden and the cabinet which i will post later.
I will post pictures soon
Friday, June 13, 2008
Whoo hoo... running water!
This morning we had the plumber out to finish up the plumbing in the kitchen. We now have a working sink and a working dishwasher. The dishwasher is missing a vent so it doesn't drain the best, but that will be coming on Monday. The faucet we purchased also includes a sprayer this excites me a great deal it has been a long 2 years without one.

We also have a working dishwasher. I've never been a huge dishwasher fan but now working full time I find it difficult to be excited about spending an hour or so standing at the sink washing all the dishes by hand.
We should be in the kitchen by next weekend if we are lucky. The stove delivery will happen on Friday but we are still recruiting for people to assist us in moving the refrigerator on Saturday. If you are in the Central WI area next Saturday and have a strong back don't be shy. Other than the appliance moving we need to complete a small amount of trim, quarter round, a gas line, the pantry and that should be it. I'm still having a hard time that it's actually real. There were definitely some dark days in there days I thought that we might never ever finish.
Today well the plumber was here I got the opportunity to clean out my car. Something I haven't done since we started on this project. It's just so hard to find the motivation to do these small tasks when your weekends are all taken up by home improvement projects and traveling. After the kitchen we just need to bang out the back hall and the stairs and we should be back to living like civilized human beings.
We also have a working dishwasher. I've never been a huge dishwasher fan but now working full time I find it difficult to be excited about spending an hour or so standing at the sink washing all the dishes by hand.
We should be in the kitchen by next weekend if we are lucky. The stove delivery will happen on Friday but we are still recruiting for people to assist us in moving the refrigerator on Saturday. If you are in the Central WI area next Saturday and have a strong back don't be shy. Other than the appliance moving we need to complete a small amount of trim, quarter round, a gas line, the pantry and that should be it. I'm still having a hard time that it's actually real. There were definitely some dark days in there days I thought that we might never ever finish.
Today well the plumber was here I got the opportunity to clean out my car. Something I haven't done since we started on this project. It's just so hard to find the motivation to do these small tasks when your weekends are all taken up by home improvement projects and traveling. After the kitchen we just need to bang out the back hall and the stairs and we should be back to living like civilized human beings.
Wednesday, June 11, 2008
Floor is finished
After 3 days of crawling around on the floor and the fumes oh my the fumes. Here it is all finished. This is 3 coats of Waterlox, which I think came out very well. It was pretty easy to work with albeit on a bit on the expensive side, nearly twice the price of poly . I think If we use it again the low VOC version might be worth the additional 30 bucks. All things considered I would use it again.
I am very happy with the finished product. It's rustic but I think it works for a kitchen.
Saturday, June 7, 2008
Progress Report
Lots of progress to report. Chris's parents came up last weekend and did helped us with some gardening, no pictures yet. I'm trying to get Chris to post about the gardening since I hid inside sanding the floor while everyone else worked on the garden. I decided not to rent a sander so I've been doing the whole thing with a random orbital sander. I was concerned that if we rented a sander we would take off too much of the wood and that it would end up just a bit too perfect. In this whole project one of my overall goals has been to make the kitchen look like it belongs to the house.
With this goal in mind I've been going back and forth about floor finishes for quite some time. Most of our rooms still have the original shellacked floors with their nice orangey color. I toyed with the idea of doing the same in the kitchen but decided against it because of durability concerns, a kitchen is going to see a lot of water and it is very possible that alcohol may be spilled which could put the finish at risk. So then I was leaning towards doing an alcohol based stain to get a similar shade and then finishing with a water based poly I had a lot of concerns about that as well we have a lot of different boards pieced in to the floor that are a lot of different ages and I just didn't know how the different woods were going to take the stain and at this point I just don't have the heart to strip it down again and re-sand. So in the end I decided on Waterlox I think it's going to give me some of the color that I desire and it should be easily reparable but still have the durability that the poly would have given me.
I did some test areas with it this afternoon and I think it's going to work out wonderfully. Here is the sample from the stove area. The stove area is probably one of the areas in the kitchen with the most cobbled together flooring I figure if it can look good there it should look good anywhere.
Waterlox has a 12-24 hour cure time and unfortunately for us the kitchen serves not only as a kitchen but also as hallway so the plan is that I will begin starting tomorrow night at 6:00 and then do one coat each night until I'm finished. Fortunately we still have the stairs on the back of our house that used to lead up to the upstairs apartment so we should be able to avoid the room in the evenings while the finish is curing. I hope to finish up by Wednesday so the floor will have a day and a half to cure before the plumber comes Friday.
With this goal in mind I've been going back and forth about floor finishes for quite some time. Most of our rooms still have the original shellacked floors with their nice orangey color. I toyed with the idea of doing the same in the kitchen but decided against it because of durability concerns, a kitchen is going to see a lot of water and it is very possible that alcohol may be spilled which could put the finish at risk. So then I was leaning towards doing an alcohol based stain to get a similar shade and then finishing with a water based poly I had a lot of concerns about that as well we have a lot of different boards pieced in to the floor that are a lot of different ages and I just didn't know how the different woods were going to take the stain and at this point I just don't have the heart to strip it down again and re-sand. So in the end I decided on Waterlox I think it's going to give me some of the color that I desire and it should be easily reparable but still have the durability that the poly would have given me.
I did some test areas with it this afternoon and I think it's going to work out wonderfully. Here is the sample from the stove area. The stove area is probably one of the areas in the kitchen with the most cobbled together flooring I figure if it can look good there it should look good anywhere.
Thursday, May 29, 2008
Grouted and caulked
Wednesday, May 28, 2008
Grout Finished
I finished grouting the counter top and back splash last night. It was a lot more work than I had anticipated. Over all the Epoxy grout was not difficult to work with, but the float is heavier than a standard grout float so by the end of Monday my hands just hurt, but the counter top was done.
The back splash was more of a pain because there was not as much room to work the grout in with the float. I ended up just using my fingers to press the grout in then I finished up with the float to clean the excess of the tile. That worked pretty well and I was able to finish up the back splash last night.
Freezing the grout does lengthen it's cure time so I used a bucket of ice water while i worked to give myself more time to grout and wash. I even froze the leftovers from Mondays work and used them on Tuesday and while the grout was a little thicker it applied nearly the same. Visually there is no difference between the epoxy grout that i froze over night and the batch that I made fresh which is very handy as the pot life the the grout is only around an hour at 70 degrees F room temperature.
Pictures to come.
The back splash was more of a pain because there was not as much room to work the grout in with the float. I ended up just using my fingers to press the grout in then I finished up with the float to clean the excess of the tile. That worked pretty well and I was able to finish up the back splash last night.
Freezing the grout does lengthen it's cure time so I used a bucket of ice water while i worked to give myself more time to grout and wash. I even froze the leftovers from Mondays work and used them on Tuesday and while the grout was a little thicker it applied nearly the same. Visually there is no difference between the epoxy grout that i froze over night and the batch that I made fresh which is very handy as the pot life the the grout is only around an hour at 70 degrees F room temperature.
Pictures to come.
Saturday, May 24, 2008
Continuing our slow limp to the finish
Today we did make some good forward progress with the tile we're at about 90% right now should only be another hour tomorrow to get the rest of it laid. We would have been finished today but Chris installed the new lights today and the thought of tripping over one another while we occupied the same space on totally different projects was not pleasing.
The new lights are the Quimby from Rejuvenation. When we pulled them from the box originally I was not pleased with them they were not quite what I expected. Because the wire on the fixture is exposed they use lamp wire to run through chain and up to the electrical box. When they arrived the lamp wire was pulled very tight so tight that it kinked the chain and made the fixture appear crooked. They also have a ground wire running from the box down to the light itself. It is inconspicuous now that they are hung but down at eye level it was a bit displeasing. We adjusted the cord and tinkered with them a bit and they are hanging much straighter now. After seeing them properly mounted I think that they really work and I cannot imagine having anything else in their place.

I also had some concerns that they would not be bright enough it seems that almost all kitchens will have a center light in addition to the pendants. However they seem to be fine we will also have lights on the stove hood and will most likely add a small undercabinet light to the corner closest to the sink.
Here is an updated shot of the tile.
Tomorrow morning's tiling will consist of adding bull nose pieces to the edges and the addition of 2 rows of tile below counter top level in the stove area once those areas are finished up we will be ready for grout. We are scheduled to have visitors next weekend so it is unlikely grout will be applied so the tile project will probably carry on for at least 2 more weekends. In the meantime I will be starting to sand up the floor.
The new lights are the Quimby from Rejuvenation. When we pulled them from the box originally I was not pleased with them they were not quite what I expected. Because the wire on the fixture is exposed they use lamp wire to run through chain and up to the electrical box. When they arrived the lamp wire was pulled very tight so tight that it kinked the chain and made the fixture appear crooked. They also have a ground wire running from the box down to the light itself. It is inconspicuous now that they are hung but down at eye level it was a bit displeasing. We adjusted the cord and tinkered with them a bit and they are hanging much straighter now. After seeing them properly mounted I think that they really work and I cannot imagine having anything else in their place.
I also had some concerns that they would not be bright enough it seems that almost all kitchens will have a center light in addition to the pendants. However they seem to be fine we will also have lights on the stove hood and will most likely add a small undercabinet light to the corner closest to the sink.
Here is an updated shot of the tile.
Tuesday, May 20, 2008
Tile Progress
Well the counter top is all stuck down and we are at about 40% on the back splash tile. We still need to do the other 60% of the back splash plus grout to complete the project. Chris and I are working as a team on this I do the layout, he does the cutting, and I apply the tile and then he will finish up with grout.
We pre-laid out all the tile but the first sink side got all discombobulated in the process of sticking the tiles down with the thin set so approximately 20 tiles had to be re-cut. The second side we only had to re-cut about 6 tiles so we did improve dramatically. Anyways on to the pics

We pre-laid out all the tile but the first sink side got all discombobulated in the process of sticking the tiles down with the thin set so approximately 20 tiles had to be re-cut. The second side we only had to re-cut about 6 tiles so we did improve dramatically. Anyways on to the pics
Subscribe to:
Posts (Atom)