
Tuesday, December 2, 2008
a quick update
We have more or less taken a break to enjoy the house and the new kitchen. Now that winter is coming quickly we are working on getting our workshops in the basement.
Friday, September 5, 2008
Slowly Plugging Away on the Back Hall
I was able to get the bead board and trim stained this past weekend using the new technique of the alcohol dye. I'm pretty happy with the results the color isn't as vibrant as the dyed shellac but the tone is much more even and it's far easier to work with.
Before we removed the Vinyl flooring from the back hall my plan was to just paint the back steps I figured they would be in horrible condition and it wouldn't be worth the time to ready them for a clear finish. Then I would have added some sand to the tread to keep people slipping with wet feet.
Turns out the stairs other than some damage from the metal tips the stairs were in rather good condition. So I decided to stain and clear coat them however I was still concerned about them being slick so I did a little online research and found out that you could at a clear sand like material to the clear coat to give the stairs some grip I called around and found this http://www.hcconcrete.com/products/solid-color-stains/Shark_Grip_Slip_Resistant_Additive/index.jsp at Sherwin Williams I mixed it in with Waterlox and rolled it onto the stair treads. It's barley noticeable when looking straight on which is really nice. But still gives you that grit that keeps you from riding down the stairs on your keester.
Here is one of the treads with the Clear Coat and SharkGrip
 Tonight I'm going to apply another coat then one or two on Saturday and it should be it for the stairs then it's time for paint!
Wednesday, August 20, 2008
Back from the Hiatus
I'm happy to say that even though we have not posted to the web in awhile we did manage to get a lot done. We have the kitchen to a 99.9% finish point.
Here is the way it looked in May of 2006 when we bought the house.
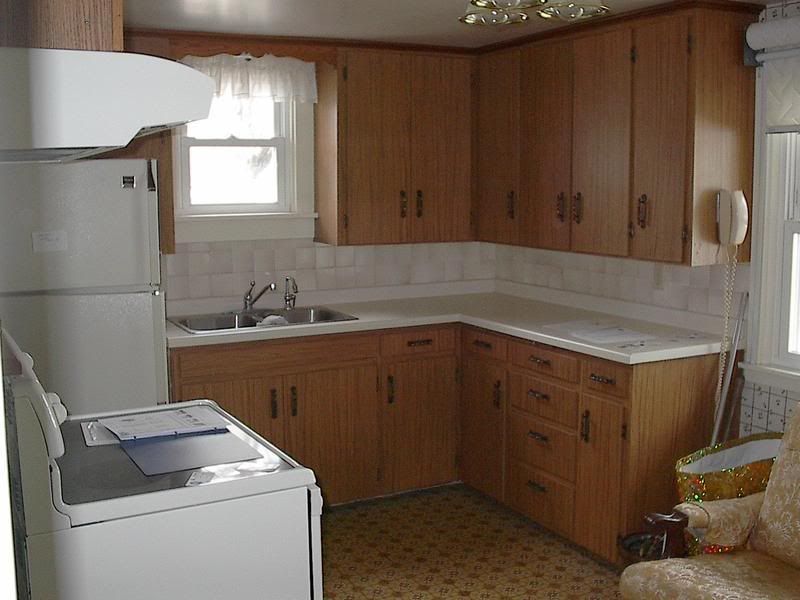
And here it is this past weekend.
We have also been working on getting the back hall ready for paint. The back hall needed a lot of patching I think that is where the apprentice plaster was at work the plaster is thin and brittle especially around the ceiling area so when they put up the paneling it just got destroyed.
We also removed the carpeting from the living room, dining room, and upstairs sitting room.

All of the floors were in relatively good condition however the living room and dining rooms have rug outlines in the center of the rooms which I thought may be the case considering the age of the house. We bought a rug for the living room and are waiting on the dining room for the time being. It still looks better than that carpet looked towards the end, ick!
Here is the way it looked in May of 2006 when we bought the house.
And here it is this past weekend.

We have also been working on getting the back hall ready for paint. The back hall needed a lot of patching I think that is where the apprentice plaster was at work the plaster is thin and brittle especially around the ceiling area so when they put up the paneling it just got destroyed.
We also removed the carpeting from the living room, dining room, and upstairs sitting room.

All of the floors were in relatively good condition however the living room and dining rooms have rug outlines in the center of the rooms which I thought may be the case considering the age of the house. We bought a rug for the living room and are waiting on the dining room for the time being. It still looks better than that carpet looked towards the end, ick!
Thursday, July 10, 2008
We are in the kitchen
Well we are in the kitchen now and it's great to be able to cook on an actual stove and not have to run up and down stairs to eat. We still do not have a pantry but I'm working on fixing that. I need to finish the cabinet for the pantry.
The cabinet is going pretty well I was going to do one piece, but at 89" tall, 20" deep, and 33" wide it is a bit to large to fit in the pantry assembled and assembling it in the pantry will probably compromise it's integrity, so i chopped it in half. Now i have a 35" tall by 20" deep by 33" wide base cabinet and an upper cabinet which means that I can assemble them in the basement and just mount them to the wall when finished.
The deer have been in the Hostas which is a pain. I just need to remember to use liquid fence, it seems to keep them away, but only last a week or so.
I have some pictures of the garden and the cabinet which i will post later.
I will post pictures soon
Friday, June 13, 2008
Whoo hoo... running water!
This morning we had the plumber out to finish up the plumbing in the kitchen. We now have a working sink and a working dishwasher. The dishwasher is missing a vent so it doesn't drain the best, but that will be coming on Monday. The faucet we purchased also includes a sprayer this excites me a great deal it has been a long 2 years without one.

We also have a working dishwasher. I've never been a huge dishwasher fan but now working full time I find it difficult to be excited about spending an hour or so standing at the sink washing all the dishes by hand.
We should be in the kitchen by next weekend if we are lucky. The stove delivery will happen on Friday but we are still recruiting for people to assist us in moving the refrigerator on Saturday. If you are in the Central WI area next Saturday and have a strong back don't be shy. Other than the appliance moving we need to complete a small amount of trim, quarter round, a gas line, the pantry and that should be it. I'm still having a hard time that it's actually real. There were definitely some dark days in there days I thought that we might never ever finish.
Today well the plumber was here I got the opportunity to clean out my car. Something I haven't done since we started on this project. It's just so hard to find the motivation to do these small tasks when your weekends are all taken up by home improvement projects and traveling. After the kitchen we just need to bang out the back hall and the stairs and we should be back to living like civilized human beings.

We also have a working dishwasher. I've never been a huge dishwasher fan but now working full time I find it difficult to be excited about spending an hour or so standing at the sink washing all the dishes by hand.

We should be in the kitchen by next weekend if we are lucky. The stove delivery will happen on Friday but we are still recruiting for people to assist us in moving the refrigerator on Saturday. If you are in the Central WI area next Saturday and have a strong back don't be shy. Other than the appliance moving we need to complete a small amount of trim, quarter round, a gas line, the pantry and that should be it. I'm still having a hard time that it's actually real. There were definitely some dark days in there days I thought that we might never ever finish.
Today well the plumber was here I got the opportunity to clean out my car. Something I haven't done since we started on this project. It's just so hard to find the motivation to do these small tasks when your weekends are all taken up by home improvement projects and traveling. After the kitchen we just need to bang out the back hall and the stairs and we should be back to living like civilized human beings.
Wednesday, June 11, 2008
Floor is finished
After 3 days of crawling around on the floor and the fumes oh my the fumes. Here it is all finished. This is 3 coats of Waterlox, which I think came out very well. It was pretty easy to work with albeit on a bit on the expensive side, nearly twice the price of poly . I think If we use it again the low VOC version might be worth the additional 30 bucks. All things considered I would use it again.
I am very happy with the finished product. It's rustic but I think it works for a kitchen.

I am very happy with the finished product. It's rustic but I think it works for a kitchen.

Saturday, June 7, 2008
Progress Report
Lots of progress to report. Chris's parents came up last weekend and did helped us with some gardening, no pictures yet. I'm trying to get Chris to post about the gardening since I hid inside sanding the floor while everyone else worked on the garden. I decided not to rent a sander so I've been doing the whole thing with a random orbital sander. I was concerned that if we rented a sander we would take off too much of the wood and that it would end up just a bit too perfect. In this whole project one of my overall goals has been to make the kitchen look like it belongs to the house.
With this goal in mind I've been going back and forth about floor finishes for quite some time. Most of our rooms still have the original shellacked floors with their nice orangey color. I toyed with the idea of doing the same in the kitchen but decided against it because of durability concerns, a kitchen is going to see a lot of water and it is very possible that alcohol may be spilled which could put the finish at risk. So then I was leaning towards doing an alcohol based stain to get a similar shade and then finishing with a water based poly I had a lot of concerns about that as well we have a lot of different boards pieced in to the floor that are a lot of different ages and I just didn't know how the different woods were going to take the stain and at this point I just don't have the heart to strip it down again and re-sand. So in the end I decided on Waterlox I think it's going to give me some of the color that I desire and it should be easily reparable but still have the durability that the poly would have given me.
I did some test areas with it this afternoon and I think it's going to work out wonderfully. Here is the sample from the stove area. The stove area is probably one of the areas in the kitchen with the most cobbled together flooring I figure if it can look good there it should look good anywhere.
 Waterlox has a 12-24 hour cure time and unfortunately for us the kitchen serves not only as a kitchen but also as hallway so the plan is that I will begin starting tomorrow night at 6:00 and then do one coat each night until I'm finished. Fortunately we still have the stairs on the back of our house that used to lead up to the upstairs apartment so we should be able to avoid the room in the evenings while the finish is curing. I hope to finish up by Wednesday so the floor will have a day and a half to cure before the plumber comes Friday.
Thursday, May 29, 2008
Grouted and caulked
Here is the updated pictures the tile is grouted, caulked and we got to take down all the plastic and admire it. The next and last hurdle is the floor. Wish us luck.


Wednesday, May 28, 2008
Grout Finished
I finished grouting the counter top and back splash last night. It was a lot more work than I had anticipated. Over all the Epoxy grout was not difficult to work with, but the float is heavier than a standard grout float so by the end of Monday my hands just hurt, but the counter top was done.
The back splash was more of a pain because there was not as much room to work the grout in with the float. I ended up just using my fingers to press the grout in then I finished up with the float to clean the excess of the tile. That worked pretty well and I was able to finish up the back splash last night.
Freezing the grout does lengthen it's cure time so I used a bucket of ice water while i worked to give myself more time to grout and wash. I even froze the leftovers from Mondays work and used them on Tuesday and while the grout was a little thicker it applied nearly the same. Visually there is no difference between the epoxy grout that i froze over night and the batch that I made fresh which is very handy as the pot life the the grout is only around an hour at 70 degrees F room temperature.
Pictures to come.
Saturday, May 24, 2008
Continuing our slow limp to the finish
Today we did make some good forward progress with the tile we're at about 90% right now should only be another hour tomorrow to get the rest of it laid. We would have been finished today but Chris installed the new lights today and the thought of tripping over one another while we occupied the same space on totally different projects was not pleasing.
The new lights are the Quimby from Rejuvenation. When we pulled them from the box originally I was not pleased with them they were not quite what I expected. Because the wire on the fixture is exposed they use lamp wire to run through chain and up to the electrical box. When they arrived the lamp wire was pulled very tight so tight that it kinked the chain and made the fixture appear crooked. They also have a ground wire running from the box down to the light itself. It is inconspicuous now that they are hung but down at eye level it was a bit displeasing. We adjusted the cord and tinkered with them a bit and they are hanging much straighter now. After seeing them properly mounted I think that they really work and I cannot imagine having anything else in their place.

I also had some concerns that they would not be bright enough it seems that almost all kitchens will have a center light in addition to the pendants. However they seem to be fine we will also have lights on the stove hood and will most likely add a small undercabinet light to the corner closest to the sink.
Here is an updated shot of the tile. Tomorrow morning's tiling will consist of adding bull nose pieces to the edges and the addition of 2 rows of tile below counter top level in the stove area once those areas are finished up we will be ready for grout. We are scheduled to have visitors next weekend so it is unlikely grout will be applied so the tile project will probably carry on for at least 2 more weekends. In the meantime I will be starting to sand up the floor.
The new lights are the Quimby from Rejuvenation. When we pulled them from the box originally I was not pleased with them they were not quite what I expected. Because the wire on the fixture is exposed they use lamp wire to run through chain and up to the electrical box. When they arrived the lamp wire was pulled very tight so tight that it kinked the chain and made the fixture appear crooked. They also have a ground wire running from the box down to the light itself. It is inconspicuous now that they are hung but down at eye level it was a bit displeasing. We adjusted the cord and tinkered with them a bit and they are hanging much straighter now. After seeing them properly mounted I think that they really work and I cannot imagine having anything else in their place.

I also had some concerns that they would not be bright enough it seems that almost all kitchens will have a center light in addition to the pendants. However they seem to be fine we will also have lights on the stove hood and will most likely add a small undercabinet light to the corner closest to the sink.
Here is an updated shot of the tile.
 Tomorrow morning's tiling will consist of adding bull nose pieces to the edges and the addition of 2 rows of tile below counter top level in the stove area once those areas are finished up we will be ready for grout. We are scheduled to have visitors next weekend so it is unlikely grout will be applied so the tile project will probably carry on for at least 2 more weekends. In the meantime I will be starting to sand up the floor.
Tuesday, May 20, 2008
Tile Progress
Well the counter top is all stuck down and we are at about 40% on the back splash tile. We still need to do the other 60% of the back splash plus grout to complete the project. Chris and I are working as a team on this I do the layout, he does the cutting, and I apply the tile and then he will finish up with grout.
We pre-laid out all the tile but the first sink side got all discombobulated in the process of sticking the tiles down with the thin set so approximately 20 tiles had to be re-cut. The second side we only had to re-cut about 6 tiles so we did improve dramatically. Anyways on to the pics


We pre-laid out all the tile but the first sink side got all discombobulated in the process of sticking the tiles down with the thin set so approximately 20 tiles had to be re-cut. The second side we only had to re-cut about 6 tiles so we did improve dramatically. Anyways on to the pics


Sunday, April 20, 2008
Tile layout and lighting test
Friday night we went to Lowe's to pick up the tile, that was more painful than I anticipated however I still think that we are going to be happier with the end result than we would have if we have gone with formica. Of course they did not have enough of the bullnose tile for us so that is on order they gave us an estimate of a week to a week and a half. Of course that was really the component we needed to get things started. Oh well at least we had a pretty relaxing weekend.
I of course could not resist unboxing some of the countertop tiles and doing a test layout. I think it's going to be really nice.
 I'm also hoping to order the light soon however before we get to that point we need to decide on a length. According to the resources I have found online for pendants over an island or peninsula you want them to be 72" of of the floor. Our ceiling is 7'5" which would give us 17" for overall fixture length. I didn't want the chain to be too short so I bumped that up to 18" and then as a test I hung a string from the ceiling 18" long.
  That looks about right to me. Chris is of average height so I had him stand on the inside of the counter top and look towards to door and it didn't seem to be in his face so I think that will work nicely. As someone who is on the short side I have absolutely no concept of these things.
You can also see in this picture that we have the pantry door remounted. I think it looks really good. If the tile gets in by next weekend we will be tiling. If not we'll be sanding the floor, either way fun for everyone.
Monday, April 14, 2008
Cabinets, Part 2
It is now day 2 of the cabinet install. Looks like it's going to be a couple of hours again tomorrow. Although I wish that it were done it is somewhat gratifying to know that we're not the only ones that have trouble beating the old girl into submission.
Here are todays install shots. The rest of the base cabinets are installed, the counter top base is in, and the hood is installed. Troy also installed the knobs for us. True this is something we could have done ourselves but at this point we can use all the help we can get.
 The sink was also installed today. The sink has always been an interesting design challenge. You see our sink is right next to the refrigerator which is less than ideal to begin with and then when you work in the semi custom realm of cabinets things don't always work out perfect so we had to choose would the sink be centered on the the cabinet or would it be centered on the window. We went for the window. Right now I'm having a little bit of self doubt about choosing the window but I am relatively confident that when the faucet is installed it will all come together.
 I'm also going to have to work out some things as far as the tile. The sink ended up being a lot larger than I thought it would be leaving only a small area to tile to the left of the sink and on the front edge. I'm hoping that if I draw it up I'll be able to work out all of the kinks.
Friday, April 11, 2008
Day 405 - We have Cabinets
After 405 days our Kitchen has Cabinets once again. The install isn't complete but it is an excellent start.

Here is what the kitchen looked like on our first tour of the house.

I certainly think it's an improvement. I'm excited to see what it will look like when it's finished. Troy will be back on Monday at 7:00 to finish up in addition to the cabinets he's going to install the base for the counter tops as well as the sink. Which will be very nice. I can't wait.

Here is what the kitchen looked like on our first tour of the house.
I certainly think it's an improvement. I'm excited to see what it will look like when it's finished. Troy will be back on Monday at 7:00 to finish up in addition to the cabinets he's going to install the base for the counter tops as well as the sink. Which will be very nice. I can't wait.
Wednesday, April 9, 2008
Looking Into the Past
Chris sent me this picture today.

And here it is from a similar angle tonight.
Tomorrow we put on the wall color and then we will be as ready as we will ever be for cabinet installation. Troy will be here at 9:00 AM on Friday to install the cabinets.
And here it is from a similar angle tonight.

Tomorrow we put on the wall color and then we will be as ready as we will ever be for cabinet installation. Troy will be here at 9:00 AM on Friday to install the cabinets.
Tuesday, April 8, 2008
Weekend Update - The Grand De Dusting
We had a successful weekend on the house we finally got the kitchen de-dusted and Chris did a very impressive job replicating the trim on the two windows that we added. I spent Sunday night shellacking the wood, a process I am not going to do again that dyed shellac is a total and complete pain in the ass to work with but I committed myself early in the process and at this point I just need it to match. I'm going to see how dying the polyurethane or using the dye to make an alcohol stain works with the pine in future projects I also want to tame the color a bit as it turned out a bit darker when brushed than I intended. Anyways on to the photos...


Tuesday, March 11, 2008
Plaster
First off I will answer the question why in the heck did we decide to plaster in the first place. The first and totally impractical reason is that I just happen to like it. The second and much more practical reason that we decided to try plaster is that it has the benefit of of a flexible depth, which is very handy when transitioning from new wall surface to the old. If you have ever attempted to compensate for a difference in surface wall heights using joint compound you will know what I am talking about.
We decided to use a veneer plaster system we were able to find blueboard at our local home improvement store as well as Diamond Veneer Finish Plaster. However the prefered method is not to use just the finish plaster but to have a basecoat in between. Of course they didn't carry the basecoat so I went on a wild goose all over town. The moral of the story is don't screw around with the home improvement stores when you can go right to the building supply place.
The plaster turned out ok, it was hard work and although in general I improved on every wall I did I have a long way to go I ended up having to sand high spots and fill the low spots with spackle. Would I do it again? Yes, but I'm going to need awhile to recover.

Saturday, February 9, 2008
Let there be light
Just a quick post. After a year the kitchen now has light again!!

The two lights in the center of the room are actually on a 3 way switch so we no longer have to trapse through the kitchen to turn on the light. Instructions for wiring a 3-way with two lights can be found here http://www.electrical-online.com/3wayvariation6.htm. Despite being a more complicated design then the last 3 way switch I did this one actually worked on the first time. I am beyond trilled! I would also like to praise the ideal drill attachment for use with drills my hands hurt now I can only imagine how much they would have hurt without the help of that attachment.

The two lights in the center of the room are actually on a 3 way switch so we no longer have to trapse through the kitchen to turn on the light. Instructions for wiring a 3-way with two lights can be found here http://www.electrical-online.com/3wayvariation6.htm. Despite being a more complicated design then the last 3 way switch I did this one actually worked on the first time. I am beyond trilled! I would also like to praise the ideal drill attachment for use with drills my hands hurt now I can only imagine how much they would have hurt without the help of that attachment.
Thursday, January 17, 2008
December / January Kitchen Progress
Progress is still slow on the kitchen but rather than making a huge push and burning out we're taking a more steady approach.
What's New... Well the back door is back in it's rightful place after a $200 + Electric/Gas bill I didn't think we could afford to wait any longer. Unfortunately I didn't get the frame completed like I wanted to so we'll need to take the door off the hinges again here when it gets warmer out to finish up.

I found matches for the vent covers that we have in the downstairs kitchen and bath. I'm not sure if they were original to the house or not but I think they are well suited anyways. I was able to get three but I'm still keeping my eye out for one more for the office so all of the downstairs will match. The one on the right is the original from our house and the shiny one on the left is one of the ones I got off of Ebay. I'm leaning strongly towards repainting the ones I got from Ebay as they have a little rust on them and they aren't quite the right color.
Also the kitchen has some new insulation and is missing a rather large swath of wall when the outlets and backsplash are going to go.
I am also looking into Veneer Plastering to fix the missing pieces of wall that we have obtained over the course of this project however I am having some difficulty coming up with materials in this part of the world. I have a call into a local plastering company I'm hoping that they will be able to point me in the direction of a supplier.
What's New... Well the back door is back in it's rightful place after a $200 + Electric/Gas bill I didn't think we could afford to wait any longer. Unfortunately I didn't get the frame completed like I wanted to so we'll need to take the door off the hinges again here when it gets warmer out to finish up.

I found matches for the vent covers that we have in the downstairs kitchen and bath. I'm not sure if they were original to the house or not but I think they are well suited anyways. I was able to get three but I'm still keeping my eye out for one more for the office so all of the downstairs will match. The one on the right is the original from our house and the shiny one on the left is one of the ones I got off of Ebay. I'm leaning strongly towards repainting the ones I got from Ebay as they have a little rust on them and they aren't quite the right color.

Also the kitchen has some new insulation and is missing a rather large swath of wall when the outlets and backsplash are going to go.
I am also looking into Veneer Plastering to fix the missing pieces of wall that we have obtained over the course of this project however I am having some difficulty coming up with materials in this part of the world. I have a call into a local plastering company I'm hoping that they will be able to point me in the direction of a supplier.
Subscribe to:
Posts (Atom)